(Ranked now has 4 bans during the pick and ban phase) Tags: Source edit Mobile edit Mobile web edit |
|||
| (49 intermediate revisions by 9 users not shown) | |||
| Line 1: | Line 1: | ||
| + | <center>'''PLAY {{v}} RANKED'''</center> |
||
| − | [[File:GameMode Battlegrounds.png|200px|right|link=]] |
||
| + | [[File:GameMode Unbound Siege.png|200px|right|link=]] |
||
| − | '''Ranked''' is a system in [[Paladins]] designed to provide higher quality matches for competitive players. The current season of competitive play is Season |
+ | '''Ranked''' is a system in [[Paladins]] designed to provide higher quality matches for competitive players. The current season of competitive play is Season 6. This Seasons are divided into Splits. Each Split has a duration between 3 and 6 months. |
== Description == |
== Description == |
||
| Line 7: | Line 8: | ||
Now is a great time to start your placement matches. During placements you can queue with one friend and depending on your performance you'll be placed in an appropriate division! |
Now is a great time to start your placement matches. During placements you can queue with one friend and depending on your performance you'll be placed in an appropriate division! |
||
| + | |||
| + | == Official Description == |
||
| + | Battle your way to the top of the realm. |
||
== Ranked tiers and divisions== |
== Ranked tiers and divisions== |
||
| Line 22: | Line 26: | ||
| [[File:RankIcon Grandmaster.png|128px|link=]] |
| [[File:RankIcon Grandmaster.png|128px|link=]] |
||
|- |
|- |
||
| − | ! style="width: 128px" |<span style="font-size: 110%;">'''Qualifying'''</span> |
+ | ! style="min-width: 128px" |<span style="font-size: 110%;">'''Qualifying'''</span> |
| − | ! style="width: 128px" |<span style="font-size: 110%;">'''Bronze'''</span> |
+ | ! style="min-width: 128px" |<span style="font-size: 110%;">'''Bronze'''</span> |
| − | ! style="width: 128px" |<span style="font-size: 110%;">'''Silver'''</span> |
+ | ! style="min-width: 128px" |<span style="font-size: 110%;">'''Silver'''</span> |
| − | ! style="width: 128px" |<span style="font-size: 110%;">'''Gold'''</span> |
+ | ! style="min-width: 128px" |<span style="font-size: 110%;">'''Gold'''</span> |
| − | ! style="width: 128px" |<span style="font-size: 110%;">'''Platinum'''</span> |
+ | ! style="min-width: 128px" |<span style="font-size: 110%;">'''Platinum'''</span> |
| − | ! style="width: 128px" |<span style="font-size: 110%;">'''Diamond'''</span> |
+ | ! style="min-width: 128px" |<span style="font-size: 110%;">'''Diamond'''</span> |
| − | ! style="width: 128px" |<span style="font-size: 110%;">'''Master'''</span> |
+ | ! style="min-width: 128px" |<span style="font-size: 110%;">'''Master'''</span> |
| − | ! style="width: 128px" |<span style="font-size: 110%;">'''Grandmaster'''</span> |
+ | ! style="min-width: 128px" |<span style="font-size: 110%;">'''Grandmaster'''</span> |
|} |
|} |
||
===Divisions=== |
===Divisions=== |
||
| − | Each tier, from Bronze to Diamond, is divided in 5 divisions. Earning 100 TP will cause the player to be promoted to the next division. |
+ | Each tier, from Bronze to Diamond, is divided in 5 divisions. Earning 100 TP will cause the player to be promoted to the next division. Meanwhile, losing TP will eventually cause the player's rank to decay. |
{| class="wikitable" style="text-align:center" |
{| class="wikitable" style="text-align:center" |
||
| Line 73: | Line 77: | ||
===Information=== |
===Information=== |
||
| + | [[File:Guide Ranked Progression.png|500px|thumb]] |
||
*The [[Game Modes|game mode]] played in Ranked is [[Siege]]. |
*The [[Game Modes|game mode]] played in Ranked is [[Siege]]. |
||
| − | *Players are required to be at account level 15 and have at least |
+ | *Players are required to be at account level 15 and have at least 18 owned [[champions]] to access Ranked, champions in Free-Rotation do not count. |
| − | *During champion selection, each team can ban |
+ | *During champion selection, each team can ban 4 champions so that neither team can use them. The first two bans for each team are selected at the start of the round, while the third and fourth bans are chosen after 3 members of each team have selected their champions. Additionally, the latest champion releases will be automatically unavailable in Ranked generally until the following update. Pick phase lasts 30s while the ban phase lasts 20s. An additional "bonus" of 60s will be added to each team if a player has not selected a champion past the pick phase. This bonus time is shared throughout all team members. |
*Players must play 5 qualifier matches to be assigned into a tier. |
*Players must play 5 qualifier matches to be assigned into a tier. |
||
*While in Bronze, Silver, Gold and Platinum tiers, players may queue together in groups of up to 5. |
*While in Bronze, Silver, Gold and Platinum tiers, players may queue together in groups of up to 5. |
||
| Line 85: | Line 90: | ||
====Ranked Map Rotation==== |
====Ranked Map Rotation==== |
||
| − | Each [[Patch notes|update]], [[maps]] will |
+ | Each [[Patch notes|update]], [[maps]] will be in either the Active or Reserved Map pool. Reserved maps will not appear while playing ranked during that update. Each new update will see some maps rotated in between the Active and Reserved pools. |
| + | {{main|Ranked/Map Rotation}} |
||
| − | {| class="wikitable mw-collapsible mw-collapsed" style="text-align:left; display: grid; width: 506px;" |
||
| − | |+ Season 2 Split 4 |
||
| − | ! style="width: 50%;" | Active Maps |
||
| − | ! style="width: 50%;" | Reserved Maps |
||
| − | |- |
||
| − | | [[Bazaar]] |
||
| − | | [[Frog Isle]] |
||
| − | |- |
||
| − | | [[Ascension Peak]] |
||
| − | | [[Ice Mines]] |
||
| − | |- |
||
| − | | [[Warder's Gate]] |
||
| − | | [[Timber Mill]] |
||
| − | |- |
||
| − | | [[Jaguar Falls]] |
||
| − | | [[Stone Keep]] |
||
| − | |- |
||
| − | | [[Fish Market]] |
||
| − | | |
||
| − | |- |
||
| − | | [[Brightmarsh]] |
||
| − | | |
||
| − | |- |
||
| − | | [[Serpent Beach]] |
||
| − | | |
||
| − | |- |
||
| − | | [[Splitstone Quarry]] |
||
| − | | |
||
| − | |- |
||
| − | | [[Shattered Desert]] |
||
| − | | |
||
| − | |- |
||
| − | | [[Frozen Guard]] |
||
| − | | |
||
| − | |} |
||
| − | {| class="wikitable mw-collapsible mw-collapsed" style="text-align:left; display: grid; width: 506px;" |
||
| − | |+ Season 2 Split 5 |
||
| − | ! style="width: 50%;" | Active Maps |
||
| − | ! style="width: 50%;" | Reserved Maps |
||
| − | |- |
||
| − | | [[Bazaar]] |
||
| − | | [[Frog Isle]] |
||
| − | |- |
||
| − | | [[Ascension Peak]] |
||
| − | | [[Ice Mines]] |
||
| − | |- |
||
| − | | [[Warder's Gate]] |
||
| − | | [[Timber Mill]] |
||
| − | |- |
||
| − | | [[Jaguar Falls]] |
||
| − | | [[Frozen Guard]] |
||
| − | |- |
||
| − | | [[Fish Market]] |
||
| − | | |
||
| − | |- |
||
| − | | [[Brightmarsh]] |
||
| − | | |
||
| − | |- |
||
| − | | [[Serpent Beach]] |
||
| − | | |
||
| − | |- |
||
| − | | [[Splitstone Quarry]] |
||
| − | | |
||
| − | |- |
||
| − | | [[Stone Keep]] |
||
| − | | |
||
| − | |- |
||
| − | | [[Shattered Desert]] |
||
| − | | |
||
| − | |} |
||
| − | {| class="wikitable mw-collapsible mw-collapsed" style="text-align:left; display: grid; width: 506px;" |
||
| − | |+ Season 2 Split 6 |
||
| − | ! style="width: 50%;" | Active Maps |
||
| − | ! style="width: 50%;" | Reserved Maps |
||
| − | |- |
||
| − | | [[Bazaar]] |
||
| − | | [[Ice Mines]] |
||
| − | |- |
||
| − | | [[Ascension Peak]] |
||
| − | | [[Timber Mill]] |
||
| − | |- |
||
| − | | [[Warder's Gate]] |
||
| − | | [[Frozen Guard]] |
||
| − | |- |
||
| − | | [[Jaguar Falls]] |
||
| − | | [[Shattered Desert]] |
||
| − | |- |
||
| − | | [[Fish Market]] |
||
| − | | |
||
| − | |- |
||
| − | | [[Brightmarsh]] |
||
| − | | |
||
| − | |- |
||
| − | | [[Serpent Beach]] |
||
| − | | |
||
| − | |- |
||
| − | | [[Splitstone Quarry]] |
||
| − | | |
||
| − | |- |
||
| − | | [[Frog Isle]] |
||
| − | | |
||
| − | |- |
||
| − | | [[Stone Keep]] |
||
| − | | |
||
| − | |} |
||
| − | {| class="wikitable mw-collapsible mw-collapsed" style="text-align:left; display: grid; width: 506px;" |
||
| − | |+ Season 3 Split 1.1 |
||
| − | ! style="width: 50%;" | Active Maps |
||
| − | ! style="width: 50%;" | Reserved Maps |
||
| − | |- |
||
| − | | [[Bazaar]] |
||
| − | | [[Warder's Gate]] |
||
| − | |- |
||
| − | | [[Ascension Peak]] |
||
| − | | [[Fish Market]] |
||
| − | |- |
||
| − | | [[Ice Mines]] |
||
| − | | [[Frozen Guard]] |
||
| − | |- |
||
| − | | [[Jaguar Falls]] |
||
| − | | [[Shattered Desert]] |
||
| − | |- |
||
| − | | [[Timber Mill]] |
||
| − | | |
||
| − | |- |
||
| − | | [[Brightmarsh]] |
||
| − | | |
||
| − | |- |
||
| − | | [[Serpent Beach]] |
||
| − | | |
||
| − | |- |
||
| − | | [[Splitstone Quarry]] |
||
| − | | |
||
| − | |- |
||
| − | | [[Frog Isle]] |
||
| − | | |
||
| − | |- |
||
| − | | [[Stone Keep]] |
||
| − | | |
||
| − | |} |
||
| − | {| class="wikitable mw-collapsible mw-collapsed" style="text-align:left; display: grid; width: 506px;" |
||
| − | |+ Season 3 Split 1.2 |
||
| − | ! style="width: 50%;" | Active Maps |
||
| − | ! style="width: 50%;" | Reserved Maps |
||
| − | |- |
||
| − | | [[Bazaar]] |
||
| − | | [[Timber Mill]] |
||
| − | |- |
||
| − | | [[Ascension Peak]] |
||
| − | | [[Fish Market]] |
||
| − | |- |
||
| − | | [[Ice Mines]] |
||
| − | | [[Jaguar Falls]] |
||
| − | |- |
||
| − | | [[Frozen Guard]] |
||
| − | | [[Shattered Desert]] |
||
| − | |- |
||
| − | | [[Warder's Gate]] |
||
| − | | |
||
| − | |- |
||
| − | | [[Brightmarsh]] |
||
| − | | |
||
| − | |- |
||
| − | | [[Serpent Beach]] |
||
| − | | |
||
| − | |- |
||
| − | | [[Splitstone Quarry]] |
||
| − | | |
||
| − | |- |
||
| − | | [[Frog Isle]] |
||
| − | | |
||
| − | |- |
||
| − | | [[Stone Keep]] |
||
| − | | |
||
| − | |} |
||
| − | {| class="wikitable mw-collapsible mw-collapsed" style="text-align:left; display: grid; width: 506px;" |
||
| − | |+ Season 3 Split 2 |
||
| − | ! style="width: 50%;" | Active Maps |
||
| − | ! style="width: 50%;" | Reserved Maps |
||
| − | |- |
||
| − | | [[Bazaar]] |
||
| − | | [[Timber Mill]] |
||
| − | |- |
||
| − | | [[Ascension Peak]] |
||
| − | | [[Warder's Gate]] |
||
| − | |- |
||
| − | | [[Ice Mines]] |
||
| − | | [[Frozen Guard]] |
||
| − | |- |
||
| − | | [[Jaguar Falls]] |
||
| − | | [[Shattered Desert]] |
||
| − | |- |
||
| − | | [[Fish Market]] |
||
| − | | |
||
| − | |- |
||
| − | | [[Brightmarsh]] |
||
| − | | |
||
| − | |- |
||
| − | | [[Serpent Beach]] |
||
| − | | |
||
| − | |- |
||
| − | | [[Splitstone Quarry]] |
||
| − | | |
||
| − | |- |
||
| − | | [[Frog Isle]] |
||
| − | | |
||
| − | |- |
||
| − | | [[Stone Keep]] |
||
| − | | |
||
| − | |} |
||
| − | {| class="wikitable mw-collapsible mw-collapsed" style="text-align:left; display: grid; width: 506px;" |
||
| − | |+ Season 3 Split 3 |
||
| − | ! style="width: 50%;" | Active Maps |
||
| − | ! style="width: 50%;" | Reserved Maps |
||
| − | |- |
||
| − | | [[Bazaar]] |
||
| − | | [[Timber Mill]] |
||
| − | |- |
||
| − | | [[Shattered Desert]] |
||
| − | | [[Ascension Peak]] |
||
| − | |- |
||
| − | | [[Ice Mines]] |
||
| − | | [[Frozen Guard]] |
||
| − | |- |
||
| − | | [[Jaguar Falls]] |
||
| − | | [[Serpent Beach]] |
||
| − | |- |
||
| − | | [[Fish Market]] |
||
| − | | |
||
| − | |- |
||
| − | | [[Brightmarsh]] |
||
| − | | |
||
| − | |- |
||
| − | | [[Warder's Gate]] |
||
| − | | |
||
| − | |- |
||
| − | | [[Splitstone Quarry]] |
||
| − | | |
||
| − | |- |
||
| − | | [[Frog Isle]] |
||
| − | | |
||
| − | |- |
||
| − | | [[Stone Keep]] |
||
| − | | |
||
| − | |} |
||
| − | {| class="wikitable mw-collapsible mw-collapsed" style="text-align:left; display: grid; width: 506px;" |
||
| − | |+ Season 3 Split 4 |
||
| − | ! style="width: 50%;" | Active Maps |
||
| − | ! style="width: 50%;" | Reserved Maps |
||
| − | |- |
||
| − | | [[Frog Isle]] |
||
| − | | [[Timber Mill]] |
||
| − | |- |
||
| − | | [[Ice Mines]] |
||
| − | | [[Brightmarsh]] |
||
| − | |- |
||
| − | | [[Splitstone Quarry]] |
||
| − | | [[Bazaar]] |
||
| − | |- |
||
| − | | [[Stone Keep]] |
||
| − | | [[Serpent Beach]] |
||
| − | |- |
||
| − | | [[Jaguar Falls]] |
||
| − | | |
||
| − | |- |
||
| − | | [[Fish Market]] |
||
| − | | |
||
| − | |- |
||
| − | | [[Shattered Desert]] |
||
| − | | |
||
| − | |- |
||
| − | | [[Warder's Gate]] |
||
| − | | |
||
| − | |- |
||
| − | | [[Frozen Guard]] |
||
| − | | |
||
| − | |- |
||
| − | | [[Ascension Peak]] |
||
| − | | |
||
| − | |} |
||
| − | {| class="wikitable mw-collapsible mw-collapsed" style="text-align:left; display: grid; width: 506px;" |
||
| − | |+ Season 4 Split 1 |
||
| − | ! style="width: 50%;" | Active Maps |
||
| − | ! style="width: 50%;" | Reserved Maps |
||
| − | |- |
||
| − | | [[Frog Isle]] |
||
| − | | [[Fish Market]] |
||
| − | |- |
||
| − | | [[Ice Mines]] |
||
| − | | [[Brightmarsh]] |
||
| − | |- |
||
| − | | [[Splitstone Quarry]] |
||
| − | | [[Bazaar]] |
||
| − | |- |
||
| − | | [[Stone Keep]] |
||
| − | | [[Shattered Desert]] |
||
| − | |- |
||
| − | | [[Jaguar Falls]] |
||
| − | | |
||
| − | |- |
||
| − | | [[Timber Mill]] |
||
| − | | |
||
| − | |- |
||
| − | | [[Serpent Beach]] |
||
| − | | |
||
| − | |- |
||
| − | | [[Warder's Gate]] |
||
| − | | |
||
| − | |- |
||
| − | | [[Frozen Guard]] |
||
| − | | |
||
| − | |- |
||
| − | | [[Ascension Peak]] |
||
| − | | |
||
| − | |} |
||
== Rewards == |
== Rewards == |
||
| + | [[File:Guide Ranked Rewards.png|500px|thumb|Ranked Reward Screen]] |
||
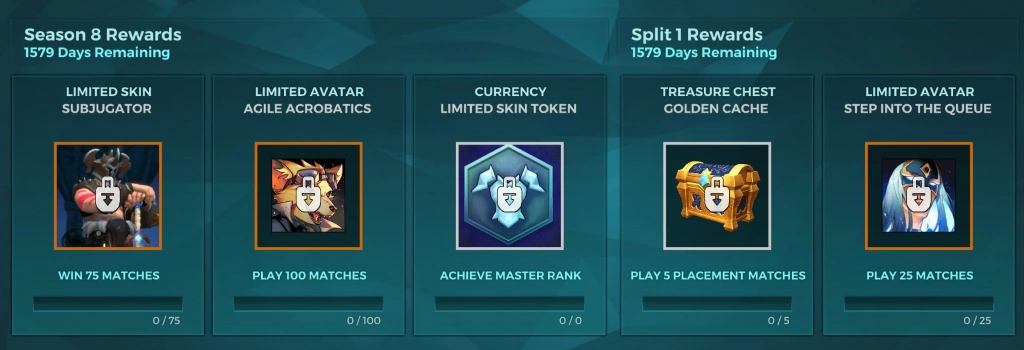
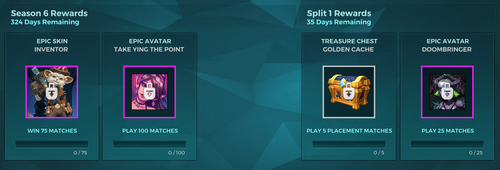
There are several special rewards that can be earned for playing Ranked matches. Each season has its own exclusive rewards, with some rewards being tied to each split. Below the rewards of the current season are listed. |
There are several special rewards that can be earned for playing Ranked matches. Each season has its own exclusive rewards, with some rewards being tied to each split. Below the rewards of the current season are listed. |
||
{{main|Ranked/Rewards}} |
{{main|Ranked/Rewards}} |
||
| − | ===Season |
+ | ===Season 6=== |
{| class="wikitable" |
{| class="wikitable" |
||
|- |
|- |
||
| − | | style="width: 130px; text-align:center" | [[File: |
+ | | style="width: 130px; text-align:center" | [[File:Pip Collection Render Inventor Icon.png|150px|link=Pip#Cosmetic Items]] |
| style="width: 500px" | |
| style="width: 500px" | |
||
| − | : <span style="font-size: 120%;">'''Exclusive Skin:''' [[ |
+ | : <span style="font-size: 120%;">'''Exclusive Skin:''' [[Pip#Cosmetic Items|Inventor]]</span> |
| + | : Win 75 Ranked matches |
||
| − | |||
| − | : Win 100 Ranked matches |
||
| − | |- |
||
| − | | style="text-align:center" | [[File:Store Title Icon.png|100px|link=Titles#Ranked Titles]] |
||
| − | | |
||
| − | : <span style="font-size: 120%;">'''Limited Title:''' [[Titles#Ranked Titles|World Ender]]</span> |
||
| − | : Play 100 Games |
||
|- |
|- |
||
| − | | style="text-align:center" | [[File: |
+ | | style="text-align:center" | [[File:Avatar Take Ying the Point Icon.png|100px|link=Avatars#Ranked]] |
| |
| |
||
| − | : <span style="font-size: 120%;">'''Limited |
+ | : <span style="font-size: 120%;">'''Limited Avatar:''' [[Avatars#Ranked|Take Ying the Point]]</span> |
| + | : Play 100 Ranked matches |
||
| − | : Reach Master during Season 4 |
||
|- |
|- |
||
| − | | style="text-align:center" | [[File:Store Loading Frame Icon.png|100px|link=Loading Frames#Season |
+ | | style="text-align:center" | [[File:Store Loading Frame Icon.png|100px|link=Loading Frames#Season 6]] |
| |
| |
||
| − | : <span style="font-size: 120%;">'''Limited Loading Frames:''' [[Loading Frames#Season |
+ | : <span style="font-size: 120%;">'''Limited Loading Frames:''' [[Loading Frames#Season 6|Ranked Season 6 Frames]]</span> |
| − | : Reach Gold 5 or higher |
+ | : Reach Gold 5 or higher during Season 6 |
|} |
|} |
||
| Line 440: | Line 126: | ||
: <span style="font-size: 120%;">'''Treasure Chest:''' [[Gold Chest]]</span> |
: <span style="font-size: 120%;">'''Treasure Chest:''' [[Gold Chest]]</span> |
||
| − | : Play |
+ | : Play 5 placement matches |
|- |
|- |
||
| − | | style="text-align:center" | [[File:Avatar |
+ | | style="text-align:center" | [[File:Avatar Doombringer Icon.png|80px|link=Avatars]] |
| |
| |
||
| − | : <span style="font-size: 120%;">'''Limited Avatar:''' |
+ | : <span style="font-size: 120%;">'''Limited Avatar:''' Doombringer</span> |
: Play 25 Ranked matches |
: Play 25 Ranked matches |
||
|} |
|} |
||
| − | ===Scoreboard |
+ | ===Scoreboard Rewards=== |
Players can earn {{Crystals}} [[Crystals]] by ending a season on Grandmaster leaderboard. |
Players can earn {{Crystals}} [[Crystals]] by ending a season on Grandmaster leaderboard. |
||
| Line 459: | Line 145: | ||
{{#ev:youtube|gRamgDqa8lM|600}} |
{{#ev:youtube|gRamgDqa8lM|600}} |
||
| + | ==Trivia== |
||
| + | *Prior to the [[Paladins Version 4.5.4175.5|gen:LOCK update]], there were only 2 bans per team rather than 3. |
||
| + | *Prior to the [[Paladins Beta Version 0.56.2014|Way of the Warrior update]], the rank was not tied to the account, but to the individual champion. Each champion could have a different rank depending on how well they performed in Ranked. When loaded into the game, this rank was displayed as a frame around the champion - [[:File:RankFrame Qualifying.png|Qualifying Frame]], [[:File:RankFrame Bronze.png|Bronze Frame]], [[:File:RankFrame Silver.png|Silver Frame]], [[:File:RankFrame Gold.png|Gold Frame]], [[:File:RankFrame Platinum.png|Platinum Frame]], [[:File:RankFrame Diamond.png|Diamond Frame]], [[:File:RankFrame Master.png|Master Frame]] and [[:File:RankFrame Grandmaster.png|Grandmaster Frame]]. |
||
{{Navbox GameModes}}{{Navbox Main}} |
{{Navbox GameModes}}{{Navbox Main}} |
||
Latest revision as of 02:21, 26 October 2023
Ranked is a system in Paladins designed to provide higher quality matches for competitive players. The current season of competitive play is Season 6. This Seasons are divided into Splits. Each Split has a duration between 3 and 6 months.
Description[ | ]
Welcome to Paladins Ranked. Paladins' in-game competitive mode will now allow players to progress as an account through each tier from Bronze to Grandmaster. As you play, you'll gain Triumph Points (or TP), and once you pass 100 TP in your current division, you are immediately promoted to the next division! If you are performing exceptionally in your current division, you may skip forward a few divisions when you're promoted.
Now is a great time to start your placement matches. During placements you can queue with one friend and depending on your performance you'll be placed in an appropriate division!
Official Description[ | ]
Battle your way to the top of the realm.
Ranked tiers and divisions[ | ]
Tiers[ | ]
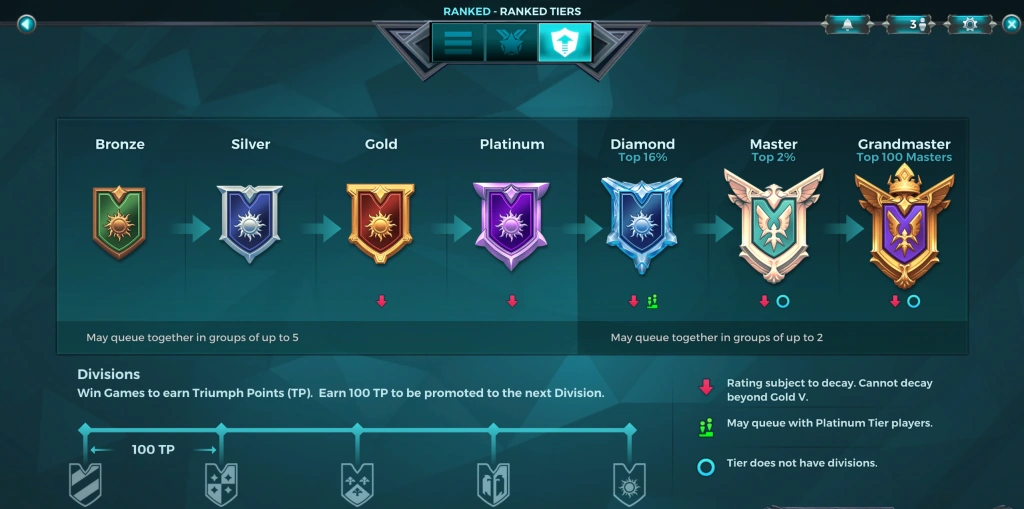
Ranked has several tiers that players can be placed in, from Bronze to Grandmaster. Players without a tier will be set as Qualifying. Winning games will grant Triumph Points (TP). Earning 100 TP while on the last division of a tier will ascend the player into the next tier.

|

|

|

|

|

|

|

|
| Qualifying | Bronze | Silver | Gold | Platinum | Diamond | Master | Grandmaster |
|---|
Divisions[ | ]
Each tier, from Bronze to Diamond, is divided in 5 divisions. Earning 100 TP will cause the player to be promoted to the next division. Meanwhile, losing TP will eventually cause the player's rank to decay.
| Bronze | 
|

|

|

|
|
|---|---|---|---|---|---|
| Silver | 
|

|

|

|
|
| Gold | 
|

|

|

|
|
| Platinum | 
|

|

|

|
|
| Diamond | 
|

|

|

|
|
Information[ | ]
- The game mode played in Ranked is Siege.
- Players are required to be at account level 15 and have at least 18 owned champions to access Ranked, champions in Free-Rotation do not count.
- During champion selection, each team can ban 4 champions so that neither team can use them. The first two bans for each team are selected at the start of the round, while the third and fourth bans are chosen after 3 members of each team have selected their champions. Additionally, the latest champion releases will be automatically unavailable in Ranked generally until the following update. Pick phase lasts 30s while the ban phase lasts 20s. An additional "bonus" of 60s will be added to each team if a player has not selected a champion past the pick phase. This bonus time is shared throughout all team members.
- Players must play 5 qualifier matches to be assigned into a tier.
- While in Bronze, Silver, Gold and Platinum tiers, players may queue together in groups of up to 5.
- While in Diamond, Master and Grandmaster tiers, players may queue together in groups of up to 2.
- Diamond Players may queue with Platinum tier players.
- Master and Grandmaster tiers have no divisions.
- Players in Gold tier or higher who lose matches or remain absent from Ranked for too long will lose TP, and eventually will be demoted to the previous division/tier. The decay stops at Gold 5.
- Players can reward other players who show positive attitudes in the community with Commendations. Commendation points and rewards reset every Ranked Season.
Ranked Map Rotation[ | ]
Each update, maps will be in either the Active or Reserved Map pool. Reserved maps will not appear while playing ranked during that update. Each new update will see some maps rotated in between the Active and Reserved pools.
Rewards[ | ]
Ranked Reward Screen
There are several special rewards that can be earned for playing Ranked matches. Each season has its own exclusive rewards, with some rewards being tied to each split. Below the rewards of the current season are listed.
Season 6[ | ]
| |
| |
|
Split 1[ | ]

- Treasure Chest: Gold Chest
- Play 5 placement matches
- Limited Avatar: Doombringer
- Play 25 Ranked matches

Scoreboard Rewards[ | ]
Players can earn ![]() Crystals by ending a season on Grandmaster leaderboard.
Crystals by ending a season on Grandmaster leaderboard.
Videos[ | ]
Intro to Ranked[ | ]
Dev Update - Season 3[ | ]
Trivia[ | ]
- Prior to the gen:LOCK update, there were only 2 bans per team rather than 3.
- Prior to the Way of the Warrior update, the rank was not tied to the account, but to the individual champion. Each champion could have a different rank depending on how well they performed in Ranked. When loaded into the game, this rank was displayed as a frame around the champion - Qualifying Frame, Bronze Frame, Silver Frame, Gold Frame, Platinum Frame, Diamond Frame, Master Frame and Grandmaster Frame.
| Game Modes | |
|---|---|
| Current |
|
| Retired |
|
| Paladins |
|---|
|
About the Game • Champions • Cards • Items • Game Modes • Maps • Ranked • Awards • Voice Guided System • Cosmetic Items • Treasure Chests • Event Pass • Quests • Patch notes |